EASY WAY TO SEW A PEPLUM DRESS + SEWING PATTERN: A STEP-BY-STEP PICTURE GUIDE

A peplum dress is an essential item for every stylish woman's closet. Its distinctive design, which highlights curves in the correct places, offers a pleasing appearance with a fitted bodice and a flared peplum waist. Making your own peplum dress lets you tailor the fit and fabric to your preference, which is perfect if you're attending a special occasion or just want to spice up your regular outfit. We'll walk you through the process of making a gorgeous peplum dress in this tutorial, so you can look good everywhere you go. Alright, take out your sewing machine and let's begin this fascinating fashion project!

Characteristics of the Peplum Dress
(I am using the Peplum Dress Sewing Pattern I got from the blue text link above as a Reference)
- The silhouette is hip-flaring and waist-fitting.
- It has a high waistline.
- The length is either midi, knee length or ankle length.
- The pattern has three neckline options which are sweetheart, round and V neck.
- It has a short and a long sleeve.
- It has a slit at the center back of the skirt.
- It has a zip closure that runs through the center back.
- Choose a very stable medium-weight woven fabric. Consider using: Ponte knit, crepe, velvet, duchesse satin, brocade, taffeta, damask, oxford and stretchy denim.
- It fits all bogy types.
- It can be worn as a corporate wear, as an official or unofficial wear.
- It fits well with a belt or bold jewelry.
Materials Needed
- Pattern: Click here to get the peplum dress sewing pattern used for this tutorial
Choose a peplum dress pattern based on your physique dimensions. Several peplum dress patterns are available online and at your Neighbour hood fabric store. Be sure the pattern you select is appropriate for your level of sewing experience. - Fabric: Select a material that matches your preferred comfort level and style. Peplum dresses are frequently made of cotton, silk, satin, and lace, among other materials. Before deciding, take into account the fabric's drape, stretch, and print.
- Bias Tape: A custom made or a store-bought bias tape that matches the color of the fabric is needed for the neck and hem finishing
- Fusible Interfacing: A fusible interfacing would be needed for the zipper allowance.
- Thread: Choose a color of thread that goes well with or contrasts with the fabric you're working with. Using premium thread is necessary to guarantee the durability and longevity of your garment.
- Zipper: The dress needs a zipper to close. Select a zip with the color that goes with the dress fabric color.
Tools Needed
- Sewing machine: To make a peplum dress, you'll need a sewing machine. Before beginning your project, make sure your sewing machine is in good operating order.
- Scissors: To cut the fabric and pattern pieces, get a good pair of sharp fabric scissors. Having fabric-specific scissors is essential to avoid dulling them on other fabrics.
- Needles and pins: Hold the fabric together with straight pins while sewing. Needles are used for button attachment, finishing touches, and hand sewing. Get a range of sizes based on the fabric's thickness.
- Measurement tape: Precise measurements are essential for a clothing that fits properly. To correctly measure and label the fabric, as well as to take your body dimensions, use a measurement tape.
- Seam Ripper: A seam ripper is your best friend when it comes to undoing mistakes made in sewing and seams. Select a ripper that has a sharp tip but take care not to rip the fabric.
- Iron and an ironing board: These are required to press your fabric and seams for a polished appearance. For wrinkle removal and clean, crisp seams, an iron and ironing board are necessary.
SEWING INSTRUCTION STEPS
Right side of fabric
Wrong side of fabric
1. Sew all the darts on the bodice and the skirt. Sew on the wrong side of the fabric.

2. Join the front and back bodice at the shoulder with right sides of the fabrics facing each other.

3. Join the bias tape to the neckline running from the center back to the front to the center back. Stitch the bias on the right side of the fabric, then turn to the wrong side of the fabrics and under stitch.

4. Join the sides of the front bodice to the back bodice with right sides of the fabrics facing each other.

5. Join the sides of the front skirt to the back skirt with right sides of the fabrics facing each other.

6. Join the sides of the front skirt to the back skirt with right sides of the fabrics facing each other.

7. Join the back peplum pieces to the front peplum pieces at the sides with the right sides of the fabrics facing each other.

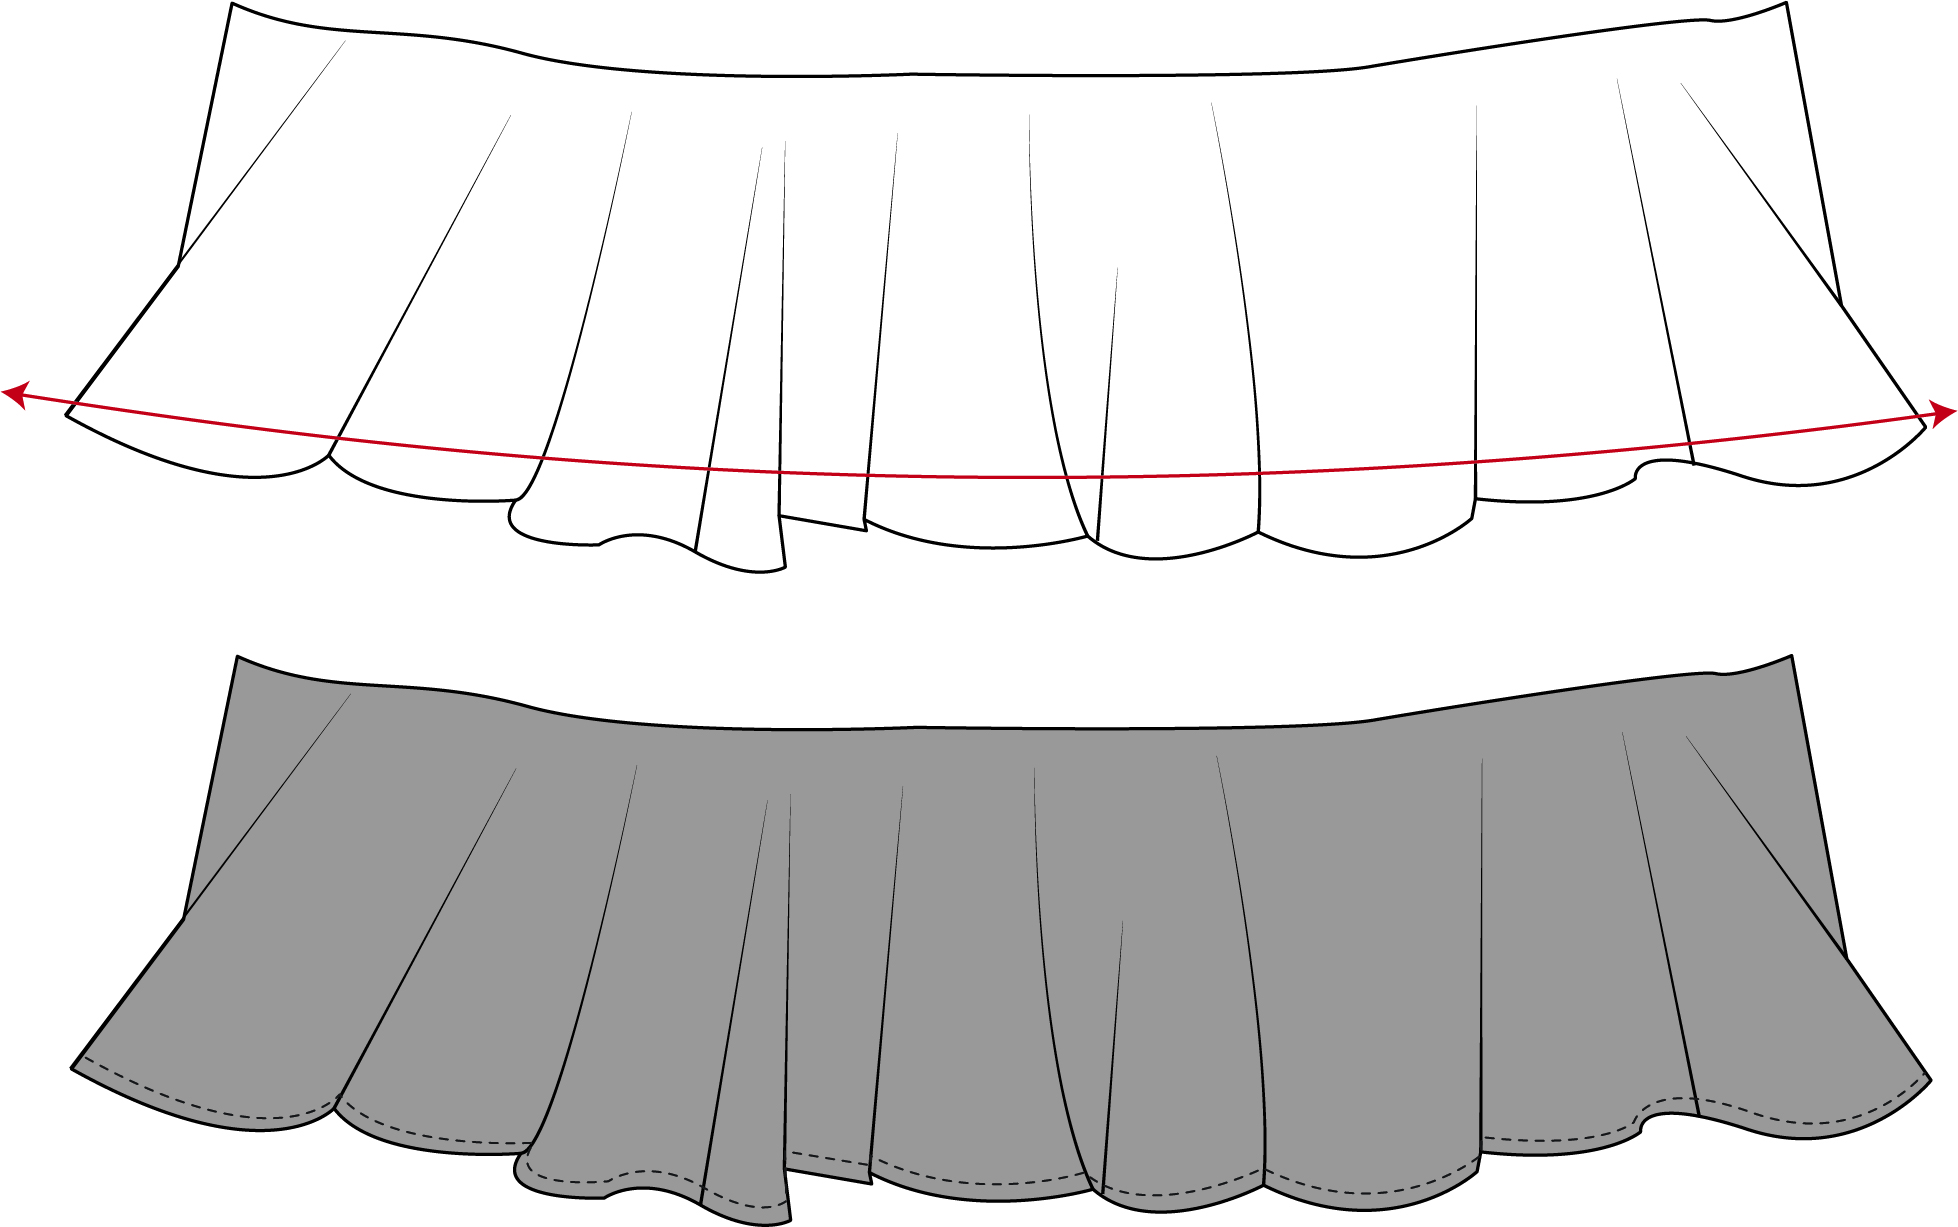
8. Spread out your peplum and hem it (the red arrowed area) with a bias tape. (See number 3 above).
9. Spread out your skirt on a flat surface with the right sides up then place your peplum on the skirt with right side up. Make sure the center front of the skirt matches the center front of the peplum as well as the side seams. Run a stitch on the pieces at the waistline within the sewing allowance i.e. with 0.25 sewing allowance or less.
Do not sew the peplum on the zipper allowance.
Pleat in or ease in excess peplum on the skirt waistline.
.jpg)
10. Join the bodice to the skirt. make sure that the right sides of the fabrics face each other.

11. For all fabric types, cut 2 strips of fusible interfacing that is 0.75” (2cm) wide that will be needed to stabilize the zipper area. The length of the strips needs to be a bit longer than the zipper.
On the wrong side of fabric, fuse the zip allowance on the center back with the fusible interfacing pieces.

12. Install the zip. Illustration is not shown. The zip allowance is 0.5”.
Tip: After sewing one side of the zipper to the garment, mark the waist points on the zipper tape to align the waist at the center-back.
Complete the center back seam stopping at your preferred slit length.

13. Hem the skirt using the folded hem method.

14. Join the sleeve at the underarm area.

15. Hem the sleeve using the folded hem method.

16. Set in each sleeve into the corresponding armhole, matching notches and ease the sleeve excess in-between the notches. Enjoy your finished garment.

17. FINISHED VIEW

You too can make a DIY peplum dress that looks polished and professional by following the above sewing instructions. It's important to keep in mind that practice makes perfect, so don't give up if your initial try doesn't go as planned. As you continue to hone your abilities and methods, you'll soon be producing exquisite clothing that can compete with items purchased from stores.
Comments
Post a Comment